The difference between flat, bubbly foam and smooth, velvety milk comes down to technique. Using a steam wand for milk is a skill that looks simple but has a few specific details that make or break the result. Get them right and your lattes and cappuccinos will taste noticeably better. Get them wrong and you end up with a pitcher full of large bubbles that no amount of tapping will fix.
Quick Answer
Here is the short version of how to steam milk with a steam wand:
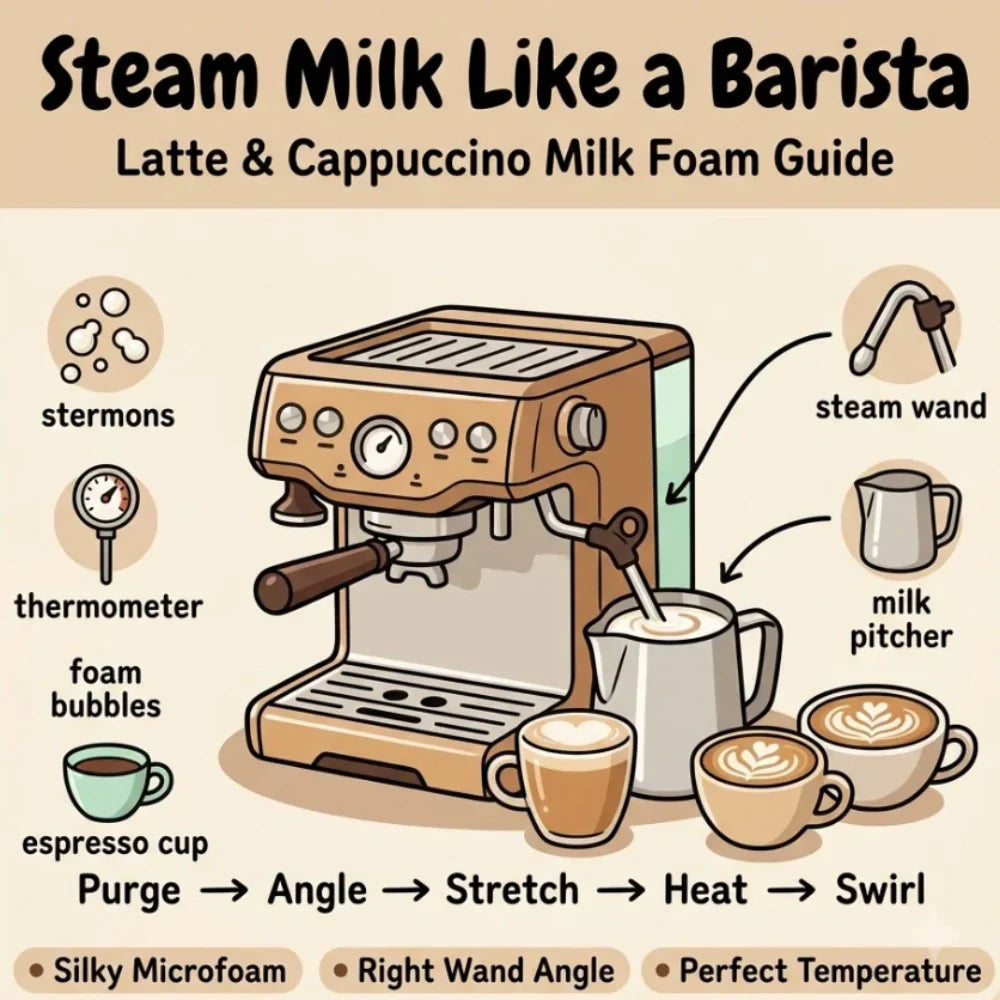
- Purge the wand for one second before placing it in the milk
- Position the tip just below the milk surface at a 15–20 degree angle
- Introduce air in the first few seconds, then submerge deeper to heat
- Stop at 140–150°F for lattes, 130–140°F for cappuccinos
- Tap and swirl the pitcher before pouring to smooth out the foam
How to Position Your Steam Wand for Better Milk Foam
The angle and depth of the steam wand in your pitcher determine whether you get silky microfoam or a messy layer of large bubbles. There are two steps to get right before steaming begins.
Purge the Steam Wand First
Before placing the steam wand into your milk, always purge it. Purging means releasing a short burst of steam to clear any condensed water that has collected inside the wand between uses. Water in your milk dilutes it and weakens the foam texture. A quick one-second blast into a cloth or towel before you start is all it takes.
Set the Angle and Depth
Once purged, position the tip of the steam wand just below the surface of the milk at a slight angle, around 15 to 20 degrees off center. This creates a gentle whirlpool motion inside the pitcher that folds air into the milk evenly rather than blasting large bubbles through it.
Depth matters throughout the process too:
- Begin with the tip just below the milk surface to introduce air in the first few seconds
- Once the milk starts to expand, lower the pitcher slightly to submerge the tip further and focus on heating
- Keep the whirlpool motion going from start to finish
A stainless steel pitcher works best because it conducts heat evenly and lets you feel the temperature change through the metal as you steam.

Which Milk Types Work Best with a Steam Wand
Not all milk behaves the same way under steam. The fat and protein content of each milk type directly affects how well it foams and how stable that foam remains in the cup. The table below compares the most common options to help you choose based on your drink preference.
| Milk Type | Foam Quality | Best For |
| Whole milk | Rich, creamy, stable foam | Lattes, cappuccinos |
| Oat milk | Smooth foam, slightly sweet | Lattes, flat whites |
| Skim milk | Stiff, airy foam, less creamy | Cappuccinos |
| Almond milk | Thinner foam, less stable | Light lattes |
| Soy milk | Smooth foam, works well with barista-formulated varieties | Lattes |
Whole milk is the most forgiving option for beginners and produces the smoothest microfoam (a fine, velvety milk texture with tiny bubbles that blend seamlessly into espresso). For plant-based alternatives, barista-formulated versions of oat or soy milk are specifically designed to foam better than standard grocery store varieties.
How to Control Milk Temperature with a Steam Wand
Temperature is one of the most important variables in milk steaming. Too cool and the milk tastes flat. Too hot and it scorches, producing a thin texture and a faintly burnt flavor that overpowers the espresso entirely. The right target depends on the drink you are making.
Temperature Targets by Drink
Each espresso drink calls for a slightly different milk temperature and texture. Here is a simple reference:
- Latte: 140 to 150°F (60 to 65°C). Smooth, glossy microfoam with minimal air bubbles.
- Cappuccino: 130 to 140°F (55 to 60°C). More foam volume and a slightly drier texture than a latte.
- Flat white: 135 to 145°F (57 to 63°C). A smaller, stronger milk drink similar to a latte. Very fine microfoam poured in a tighter volume.
How to Monitor Temperature Without a Thermometer
A thermometer is the most accurate tool, but a reliable alternative is the hand test. Place your palm against the outside of the pitcher. When it becomes too hot to hold comfortably, the milk is around 140 to 150°F and it is time to stop steaming. This takes a little practice but becomes intuitive quickly.
Stop steaming before the milk hits 160°F. Above that point, milk proteins break down and the foam becomes thin and unstable regardless of technique.
Common Steam Wand Mistakes That Ruin Your Foam
Even with the right approach in mind, a few habits consistently produce poor results. Most are easy to correct once you know what to look for.
- Starting with the tip too deep: If the wand is submerged too far from the beginning, no air enters the milk and you end up with warm, flat milk instead of foam.
- Keeping the wand in one spot: A fixed position creates uneven heating and large bubbles. Keep a gentle whirlpool motion going throughout.
- Skipping the purge: Residual water from the wand dilutes the milk and weakens the foam structure.
- Using warm milk: Cold milk straight from the refrigerator gives you more time to build foam before the temperature climbs. Always start cold.
- Skipping the tap and swirl: After steaming, tap the pitcher firmly on the counter and swirl in a circular motion to pop remaining large bubbles and unify the texture before pouring.
Better Foam Starts With the Right Setup
Steaming milk well comes down to wand position, milk choice, temperature control, and avoiding the easy mistakes. Once the technique clicks, the improvement in your lattes and cappuccinos is immediate. The SHARDOR Espresso Machine with Steam Wand gives you a manual steam wand with adjustable angle and depth, a 20 bar pump, and a 1350W Thermoblock system that heats up in 30 seconds, so everything covered here is ready to put into practice from the first cup.
FAQs about steaming and frothing milk
Q1. Can You Steam Milk Without an Espresso Machine?
Yes, but the results are different. A handheld or electric frother can heat and aerate milk, but it cannot generate the same steam pressure as a steam wand, which means the foam texture will be less refined. For lattes and cappuccinos that match café quality, an espresso machine with steam wand capability is the most effective home option.
Q2. How Do You Clean a Steam Wand After Each Use?
Wipe the wand immediately after steaming with a damp cloth to remove milk residue before it dries. Then purge a short burst of steam to clear any milk that has entered the tip. Dried milk inside the wand can block steam flow over time, so cleaning right after each use keeps performance consistent.
Q3. Is a Milk Frother the Same as a Steam Wand?
No, they work differently. A milk frother spins or vibrates to aerate cold or warm milk, while a steam wand for milk uses pressurized steam to simultaneously heat and texture the milk from the inside. Steam wands give you more control over foam density and temperature, which is why they are the standard tool for café-quality lattes and cappuccinos.
Q4. Why Can't You Steam Milk Twice?
Steaming milk a second time breaks down the proteins and sugars that were restructured during the first steam. The result is thin, flat milk that no longer holds foam properly and can taste slightly burnt or off. Always start with fresh cold milk for each drink to get the best texture and flavor.