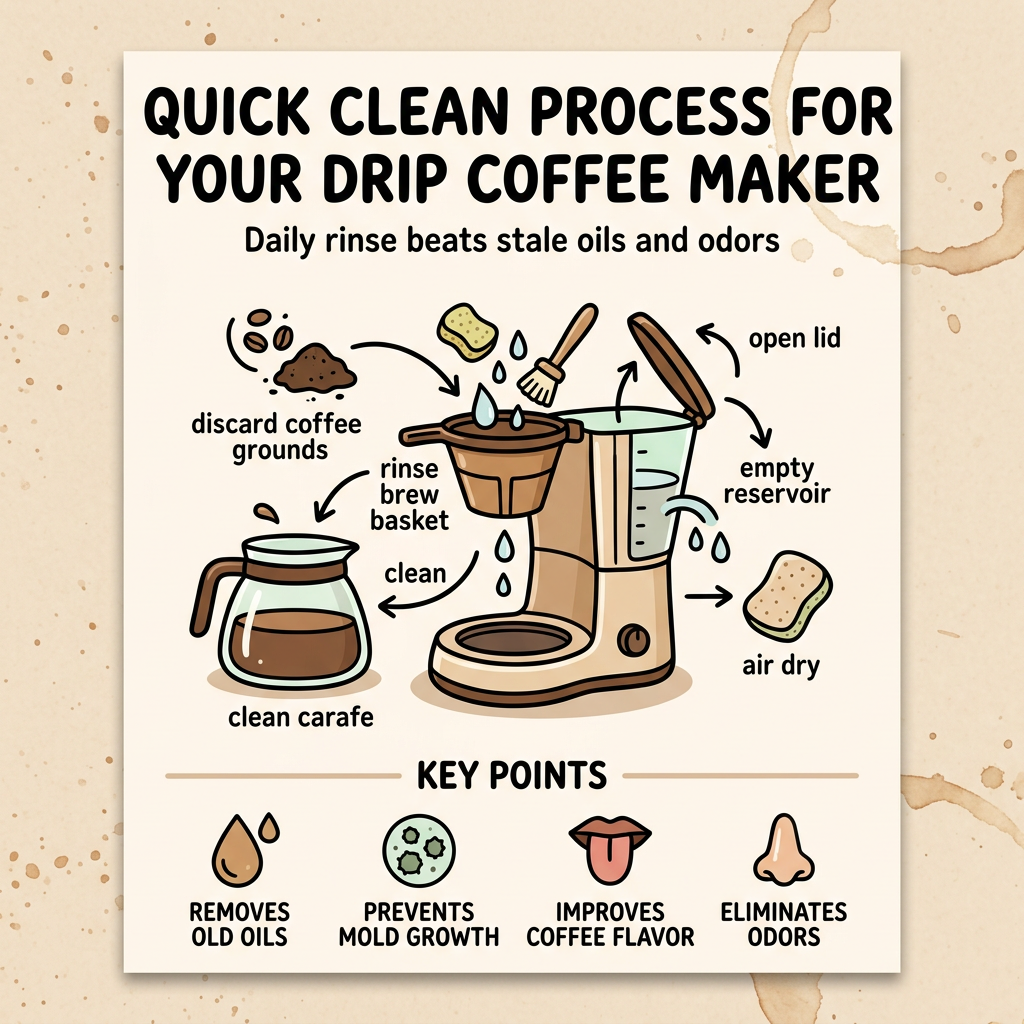
Yes, cleaning certain parts of your coffee maker after use is generally recommended to prevent old oils from affecting your next brew. While a full deep clean is not typically necessary every day, rinsing the basket and carafe helps limit the growth of bacteria and mold in damp environments. Keeping these removable pieces tidy helps ensure that your morning cup remains fresh and free from most bitter residues. This simple habit supports both the hygiene and the overall quality of your favorite drink.
The Necessity of a Clean Coffee Maker After Every Use
Leaving your machine alone after the final cup of the morning might seem harmless, but moisture can be the enemy of freshness. A coffee maker is any device used to brew coffee by passing hot water through ground beans. This machine collects organic residue with most brewing cycles.
- Oil Buildup: Fresh coffee contains natural oils that provide rich flavor but become rancid very quickly when exposed to air and heat.
- Bacterial Growth: The warm and damp environment inside a machine is a luxury hotel for mold and yeast.
- Flavor Protection: Rinsing the removable parts immediately keeps the environment hostile to germs and friendly to flavor.
- Odor Prevention: Old grounds left in the basket create a swampy smell that can soak into the plastic parts of the machine.
A Daily Maintenance Checklist for Your Coffee Maker
Consistency keeps your coffee maker running smoothly for years. You don't need professional tools or expensive products, just a disciplined routine that takes a few minutes after each brew.
The following table summarizes essential tasks to maintain your equipment:
| Component | Required Action | When to Do It |
| Brew Basket | Rinse with warm soapy water | Immediately after each use |
| Glass Carafe | Wash and dry thoroughly | Immediately after each use |
| Water Reservoir | Empty and leave lid open to air dry | After each use |
| Outer Housing | Wipe with a damp cloth | As needed when splattered |
A clean coffee maker starts with immediate action after every brew. Following these essential habits helps ensure that the only thing you taste in your morning cup is the coffee itself, not yesterday's leftovers. After each use, complete these steps:
- Dispose of grounds immediately: Wet grounds sitting in the basket create high humidity that can lead to mold growth in surprisingly little time. Remove them while still warm for the easiest cleanup.
- Wash the carafe thoroughly: Even if it looks clean, invisible oils often cling to the surface. Use mild dish soap and warm water, then rinse until no soap residue remains.
- Rinse the filter holder: Remove fine particles and stuck-on residue that contain oils. These oils can oxidize and turn bitter overnight, affecting your next brew.
- Empty and air out the reservoir: Leave the lid open between uses. This allows internal components to dry out and helps prevent moisture from creating bacterial colonies. Air circulation is one of your best defenses against the damp conditions that microorganisms love.
If you haven't used your coffee maker in several days, give the reservoir a quick rinse before brewing to ensure fresh water.
Common Risks of a Neglected Coffee Maker
If you ignore the hygiene of your coffee maker, the consequences go beyond a bad mood. Over time, the internal tubes can develop problems that affect both your health and your wallet.
Clogged Internal Tubes
A layer of biofilm can form inside the machine. A biofilm is a thin but resilient colony of bacteria that sticks to surfaces. This buildup slows down the water flow and can eventually cause the machine to stop working entirely.
Heating Element Failure
When the machine is dirty, it has to work harder to reach the correct temperature. This extra strain can lead to mechanical failure. This forces you to replace the unit much sooner than necessary.
Bitter and Sour Flavors
Old coffee oils stick to the brew basket and carafe. These oils oxidize and turn bitter. If you do not clean the coffee maker, your fresh coffee may taste like burnt plastic or vinegar, regardless of how expensive your beans are.
5 Simple Steps for a Deep-Cleaned Coffee Maker
While daily rinsing is great, a deep clean is required to tackle the invisible buildup. Perform this deep clean every 1-3 months depending on usage frequency. This process usually involves using a mixture of water and white vinegar to flush out the internal plumbing. This acidic solution breaks down the tough proteins and oils that water alone cannot touch.
- Mix equal parts of white vinegar and fresh water in the reservoir.
- Start a brew cycle and wait for the carafe to fill halfway.
- Turn off the machine and let the solution sit for thirty minutes.
- Finish the brewing cycle to flush out the loosened grime.
- Run two or three full cycles with plain water to remove the vinegar scent.

The Ideal Descaling Schedule for Your Coffee Maker
Even if you use filtered water, your machine will eventually face the threat of calcification. This is the process where calcium and magnesium from your water supply harden into solid crusts inside the pipes. This crust is often called scale. Descaling is the chemical process of removing these mineral deposits. Use the following schedule to determine how often your machine needs this service.
| Water Type or Usage | Descaling Frequency | Maintenance Level |
| Soft Water Area | Every six months | Low |
| Hard Water Area | Once every month | High |
| Daily Heavy Usage | Every two months | Medium |
| Filtered Water Usage | Every four months | Low |
Following a consistent schedule ensures the water flows freely and stays at the perfect temperature. This simple habit keeps your machine running like new for a much longer time.
FAQs about Coffee Maker Cleaning
Q1. Can I Use Baking Soda Instead of Vinegar to Clean My Coffee Maker?
Yes, baking soda can be used as a different cleaning agent. Add one-fourth cup of baking soda to a full tank of water and start a brew cycle. Baking soda, on the other hand, doesn't work as well as vinegar for eliminating heavy mineral deposits; it's better for general cleaning. You might still need vinegar to get rid of all the limescale.
Q2. How Do I Know if My Water Is Hard or Soft?
You can identify hard water by looking for white, crusty mineral buildup on your faucets or cloudy spots on your glassware. Another sign is if your soap and shampoo don't lather easily or leave a sticky residue. If your water is soft, soap bubbles form quickly and your skin usually feels smoother after washing.
Q3. Is It Safe to Drink Coffee from a Machine That Has Visible Mold?
No, you should clean the machine well before using it again. Even if the hot water kills part of the living mold, mold still releases spores and mycotoxins that can get into your coffee. Before preparing coffee, run several cycles of vinegar and wash all the parts that can be taken out. If mold comes back rapidly after you clean it, you might want to think about getting a new machine.
Q4. What Causes the Burnt Smell When I Brew Coffee After Cleaning?
The smell of burning commonly comes from mineral deposits on the heating plate or warming element that got loose while cleaning, but didn't get completely rinsed away. Another cycle of plain water should be run through the machine, and the warming plate should be wiped out with a moist towel. After one or two more rinse cycles, the scent should go away.
Keep Your Coffee Maker in Peak Condition
A clean coffee maker is often considered essential if you want consistently great coffee and a machine that lasts. Taking a few minutes every day to clean and maintain your coffee maker will make it taste better, need fewer repairs, and give you peace of mind about what you're drinking. Your morning routine needs tools that are just as fresh as the coffee they make. First, drain the water tank and clean the machine. Then, create a reminder on your calendar for your next deep clean.